Hello everyone,
i will brief on the technique and tools used to retouch and enhance the images in e-wallpaper

step 1: i will do some retouching on the book colour.. first, click Select the Rectangular Marquee tool ( ), and draw a selection border around the book

step 2: Choose Image > Adjustments > Replace Color

step 3: Select Localized Color Clusters. Then, using the Eyedropper tool ( ), click
anywhere in the book in the image window to sample that color. Then, use the Add To Sample eyedropper ( ) to sample other areas of the book until the entire book is selected and highlighted in the mask display in the Replace Color dialog box.
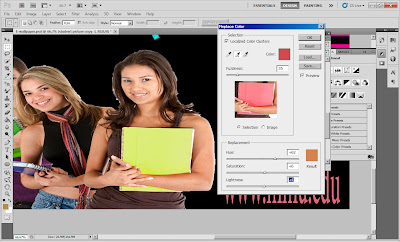

step 4: Drag the Fuzziness slider down to 35 to decrease the tolerance level slightly. In the Replacement area of the Replace Color dialog box, drag the Hue slider to
+74, the Saturation slider to +7, and the Lightness slider to -8.

step 5: As i change the values, the color of the book changes in hue, saturation, and lightness.
The book becomes yellow.

step 6: Choose Image > Adjustments > Shadows/Highlights

step 7: In the Shadows/Highlights dialog box, select Show More Options to expand the
dialog box. Then, i do the following:
• In the Shadows area, set Amount to 80% and Tonal Width to 65%.
• In the Highlights area, set Amount to 5%.
• In the Adjustments area, drag the Color Correction slider to +45
Then click ok to apply.

step 8: Choose Filter > Sharpen > Smart Sharpen. In the Smart Sharpen dialog box, i do the following:
• Reduce the Amount to 40%.
• Set the Radius to 5 pixels.
• Choose Lens Blur from the Remove menu.
• At the bottom of the dialog box, select More Accurate.

No comments:
Post a Comment